


In a tyre shop, a stiff Runflat bead, low-profile UHP casing or misplaced TPMS sensor can turn a routine tyre change into costly damage. This guide explains how to fit Runflat tyres, choose the right rim and tools, protect the sensor, and control temperature, so you can work safely and avoid common fitting errors.
- added: 26-10-2026
- in category Tire changer
Fitting Runflat and UHP tyres calls for a different procedure from a standard tyre change. A stiff sidewall, a low profile, a pressure sensor in the wheel and a rim with a higher hump mean that a routine move with the tyre lever or bead breaker can easily end in a cracked bead or a torn-off sensor. Such damage is often invisible once the tyre has been fitted, and the risk stays with it for a long time.
Below you will find a complete guide for the tyre fitter: how these tyres differ from standard tyres, how to identify them, where to position the valve or sensor for each bead, what the minimum tyre temperature is and what to check before fitting. We describe fitting and removal on a typical tyre changer with a mounting head and a bead press-down tool.
Contents
- UHP and Runflat tyres – how they differ from standard tyres
- Runflat tyre – construction, advantages, disadvantages and markings
- H2, EH2 and EH2+ rims – which hump for which tyre
- TPMS sensors and valves when fitting tyres
- Fitting basics: how a tyre passes over the rim flange
- Removal and the most common fitting errors
- Forces, lubrication and tyre changer settings
- How to fit a Runflat tyre step by step
- How to remove a Runflat tyre step by step
- Tyre temperature during fitting – minimum 15 °C in the core
- Health and safety and workplace conditions
- Checking the wheel and tyre before fitting
- Fitting damage – why it is so dangerous
- From the workshop floor
- Frequently asked questions (FAQ)
UHP and Runflat tyres – how they differ from standard tyres
UHP and Runflat tyres differ from standard tyres in:
- better handling (cornering grip, straight-line stability),
- greater mobility in the case of Runflat tyres (emergency driving after loss of pressure),
- a higher permitted speed.
As a result, they also place higher demands on:
- the fitter's qualifications,
- the tyre changer and its accessories,
- the way work is organised in the workshop.
How to identify a UHP tyre
A UHP (Ultra-High-Performance) tyre has both a profile (height-to-width ratio) of no more than 45% and a speed rating of at least V.
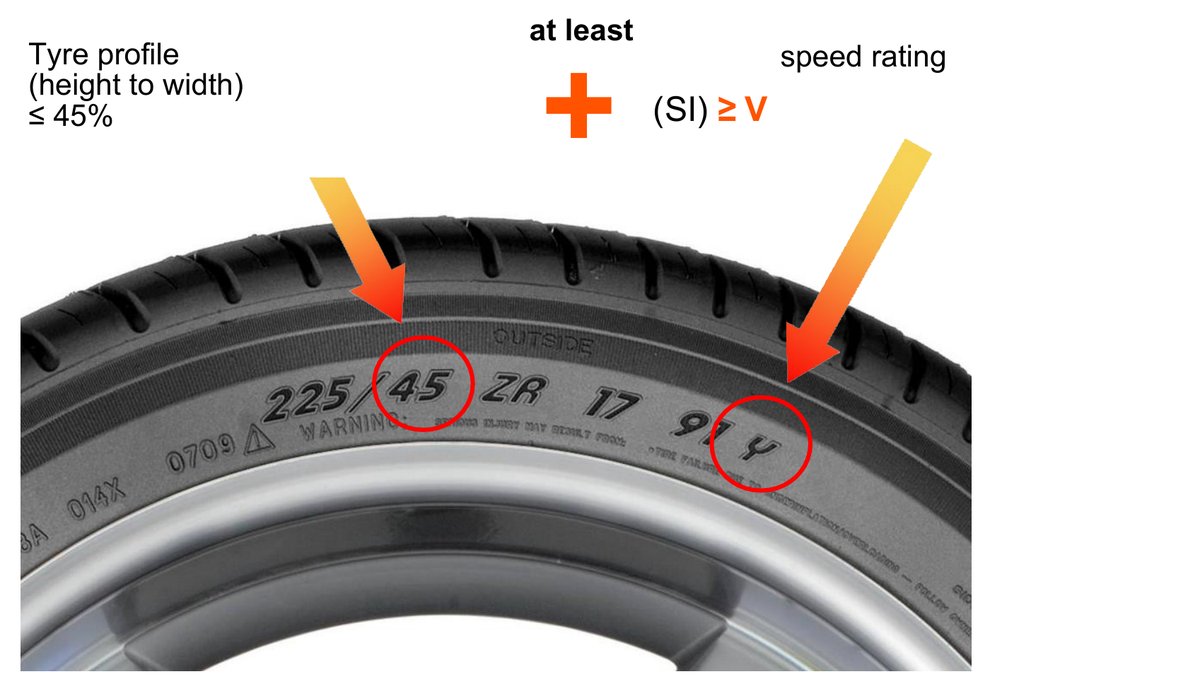
A 225/45 ZR17 91Y tyre: 45% profile and a speed rating above V, which makes it a UHP tyre.
In comparable driving conditions, a UHP tyre offers better performance and a larger safety margin in terms of:
- maximum permitted speed,
- steering precision,
- cornering stability and speed,
- braking distance,
- response to load changes.
In Germany, roughly one car in four runs on UHP tyres.
Runflat tyre – construction, advantages, disadvantages and markings
A Runflat tyre is a tyre with an extended mobility system. After a loss of pressure it lets the car keep going, which means it:
- has emergency running properties,
- is suitable for defined emergency use: at limited speed and over a limited distance that depends on the load.
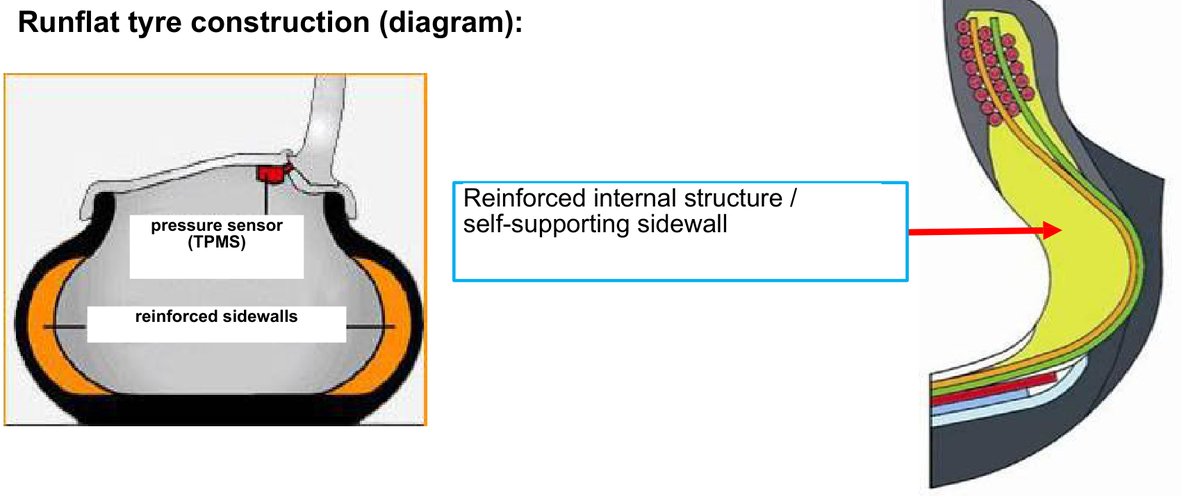
Runflat tyre construction: reinforced internal structure and self-supporting sidewall.
What happens to a tyre without pressure
Standard tyre: the lower the pressure, the more the weight of the car squashes the sidewalls. At very low pressure the sidewalls touch the tread from the inside. The tyre then flexes so much that it heats up, and the sidewalls can wear through.
Runflat tyre: the reinforced sidewalls clearly limit the deflection. Even without pressure, the sidewall does not touch the tread from the inside.
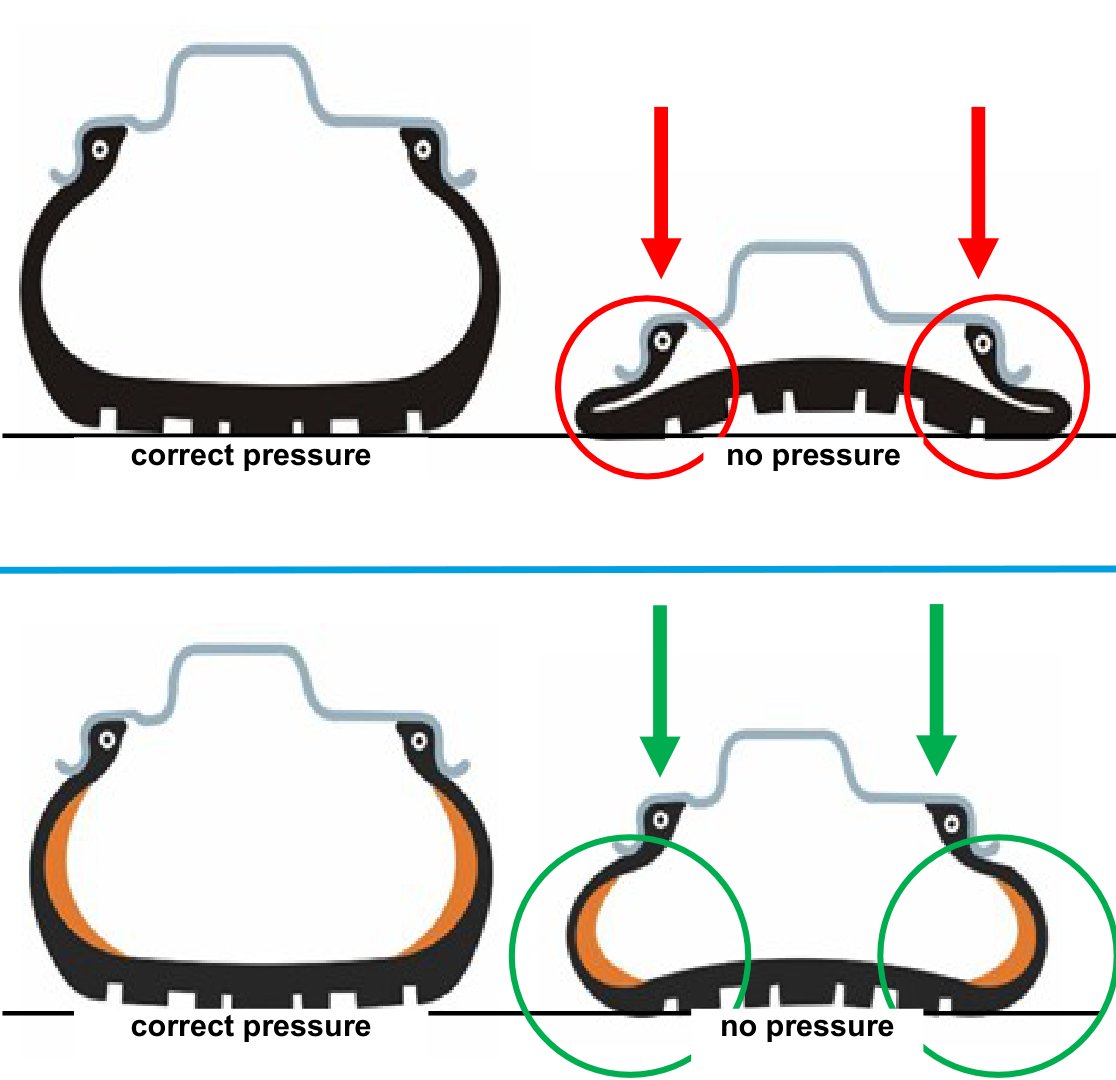
Top: standard tyre, bottom: Runflat. On the right, both without pressure.
Advantages and disadvantages of Runflat tyres
Advantages:
- after a puncture you can still drive a limited distance,
- there is no need to change the wheel immediately (e.g. in a motorway roadworks section),
- no spare wheel is needed,
- the car is lighter, so relative to its total weight it uses less fuel,
- fewer tyres end up being disposed of,
- they fit standard rims available on the market.
Disadvantages:
- they are slightly heavier than standard tyres,
- they may reduce ride comfort a little,
- they absolutely require a tyre pressure monitoring system (TPMS), which every newly registered car has today.
Runflat tyre markings
Marking according to ISO 16992 (specification for extended mobility systems). After a loss of pressure, the tyre must provide:
- a range of at least 80 km at speeds of up to 80 km/h,
- at a load of up to 65% of the value given by the load index.
You can recognise it by the letters “RF” in the size marking and by the symbol on the sidewall.
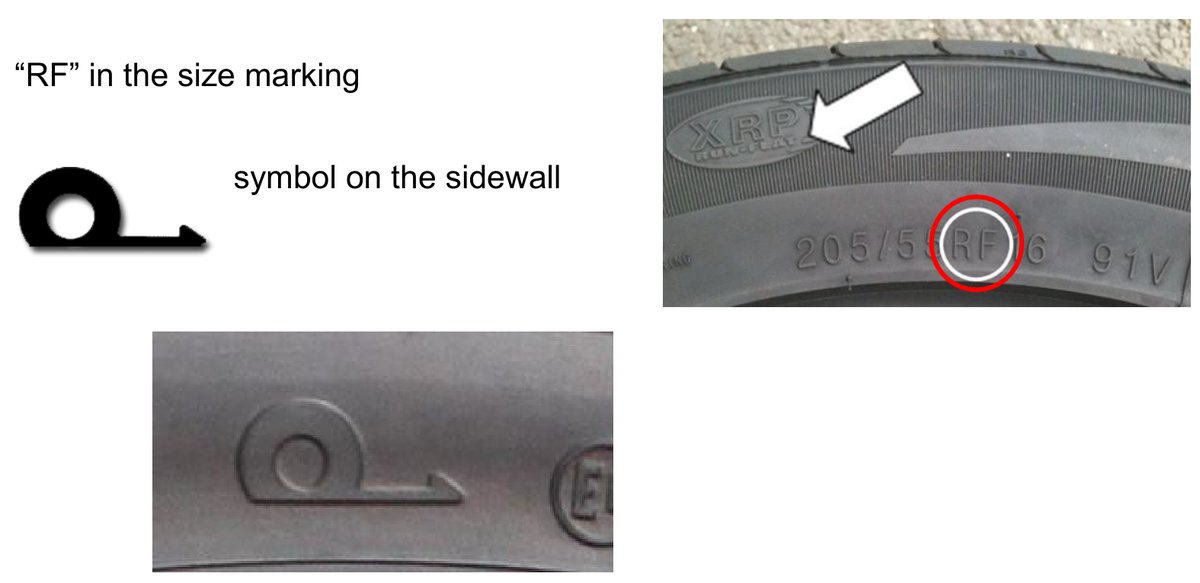
“RF” in the size (205/55 RF16) and the Runflat symbol on the sidewall.
Car and tyre manufacturers also use their own markings. Examples from car manufacturers:
- BMW: RSC (Runflat System Component),
- Mercedes-Benz: MOE (Mercedes Original Extended).
Examples from tyre manufacturers:
- Bridgestone: RFT (Run Flat Tire),
- Nokian: RSI,
- Pirelli: Run Flat,
- Michelin: ZP (Zero Pressure),
- Hankook: HRS (Hankook Runflat System),
- Continental: SSR (Self Supporting Runflat Tire),
- Dunlop: RoF (Run on Flat), DSST (Dunlop Self Supporting Technology),
- Goodyear: RoF (Run on Flat), EMT (Extended Mobility Tire),
- Kumho: XRP (Extended Runflat Performance),
- Vredestein: VRFC (Vredestein Run Flat Component).
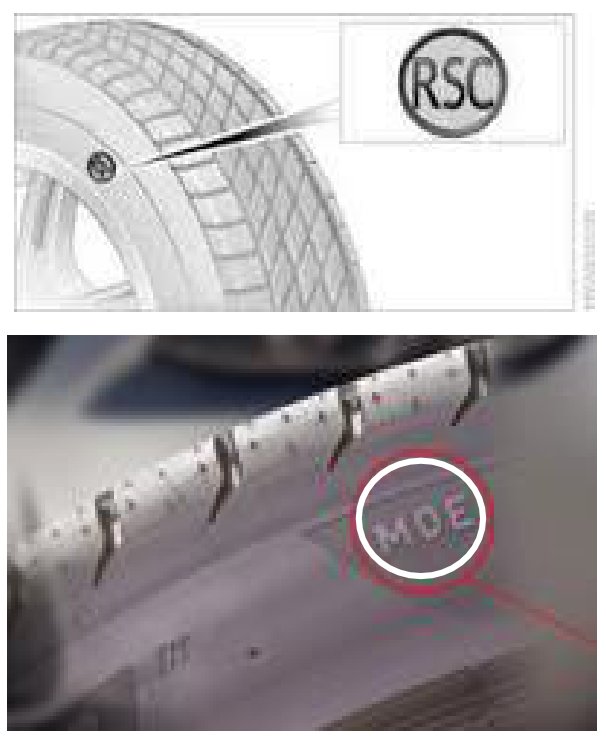
RSC and MOE markings on the sidewall.
H2, EH2 and EH2+ rims – which hump for which tyre
- H2 – Hump. The standard design for ordinary tyres (“2” means a hump on both sides). It is a raised ridge on the bead seat where the tyre bead sits. It stops the bead from slipping into the rim well when cornering.
- EH2 – Extended Hump. A raised hump. It stops the bead from slipping into the well when the tyre pressure is too low.
- EH2+ – a newer version of the Extended Hump.
EH2 and EH2+ rims hold the tyre on the rim better when the pressure is too low, which makes them particularly well suited to Runflat tyres.
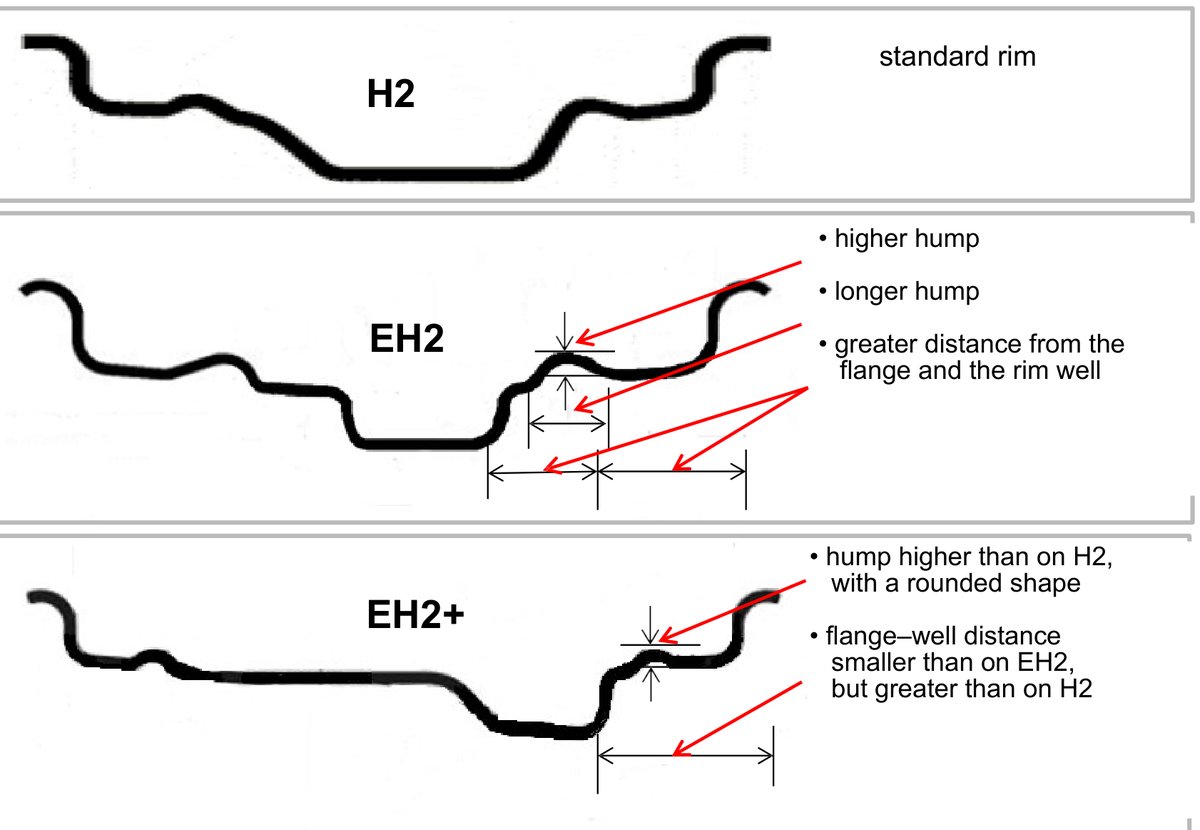
H2: standard rim. EH2: higher and longer hump, greater distance from the flange and from the well. EH2+: hump higher than on H2 and rounded; the flange-to-well distance is smaller than on EH2 but greater than on H2.
TPMS sensors and valves when fitting tyres
Benefits of a tyre pressure monitoring system (TPMS):
- greater safety for driver and passengers thanks to early detection of pressure loss,
- less tyre damage caused by driving at too low a pressure,
- longer tyre life,
- lower fuel consumption and lower CO2 emissions,
- optimum braking distance and stable handling maintained,
- greater safety for other road users.
Indirect (passive) TPMS
The system infers a loss of air from a change in the wheel's rotational speed, i.e. its dynamic rolling circumference. The ABS/ESP sensors send the data to the control unit, and software does the evaluation.
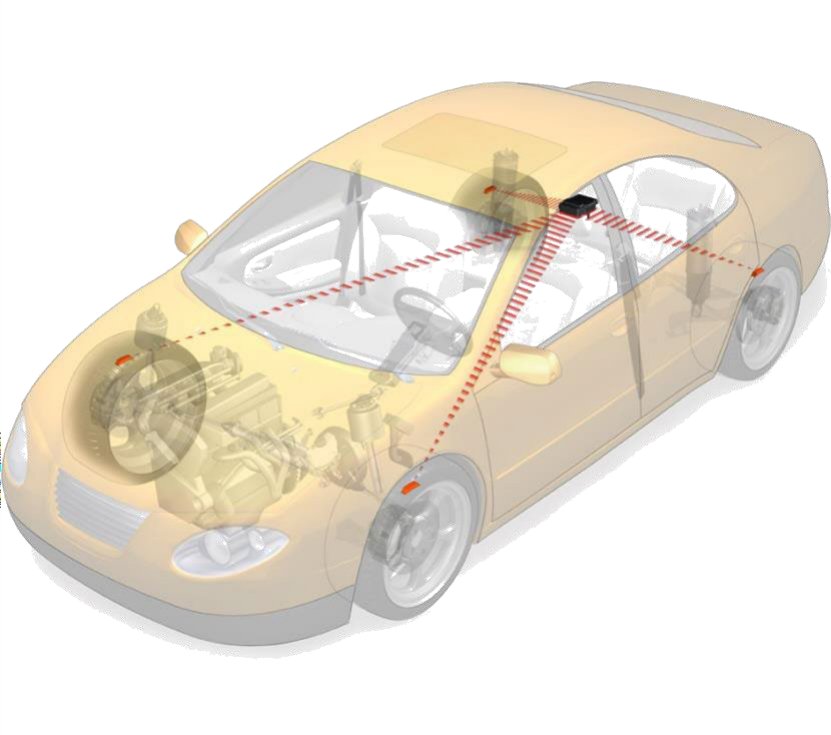
Indirect TPMS uses the ABS/ESP sensors in the wheels.
After removing and fitting a tyre, swapping wheels (summer/winter) and after correcting the pressure, the indirect system must be initialised.
Direct (active) TPMS
The sensor measures the pressure directly inside the tyre, so it shows the actual pressure. The readings are sent by radio to the car's electronics. The sensor can be integrated with the valve or fitted inside the tyre.
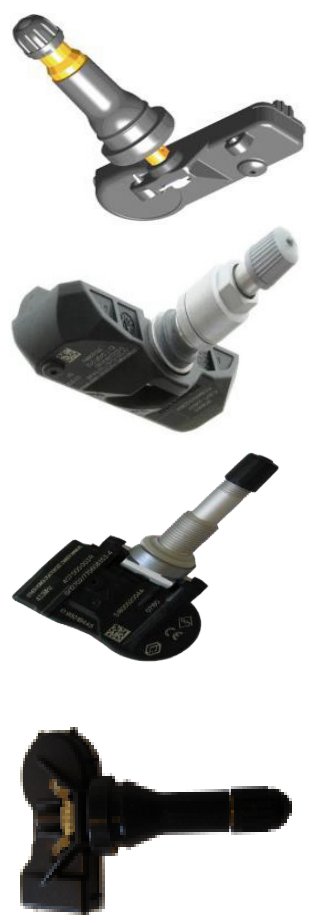
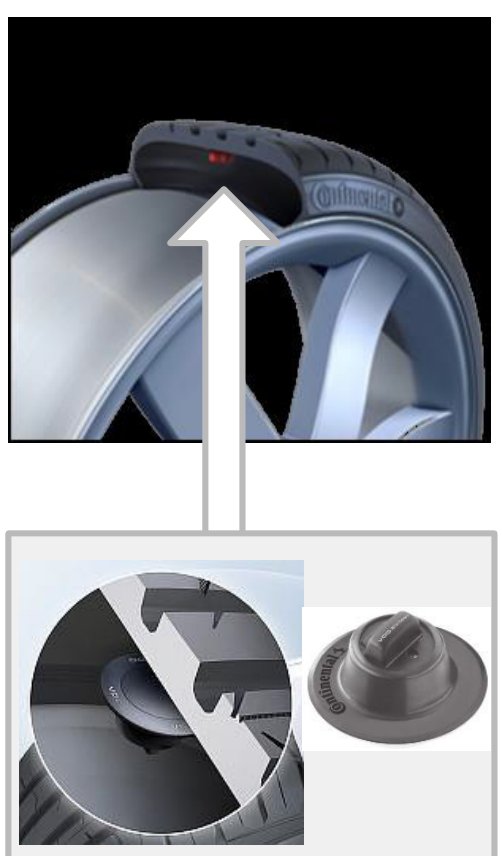
Left: valve-mounted sensors, right: sensor inside the tyre.
After removing and fitting a tyre, swapping wheels (summer/winter) and after correcting the pressure, the direct system also needs to be initialised.
How to tell which TPMS a car has
- by the warning light on the dashboard – applies to both direct and indirect systems,
- with a diagnostic tester – works with direct systems only.
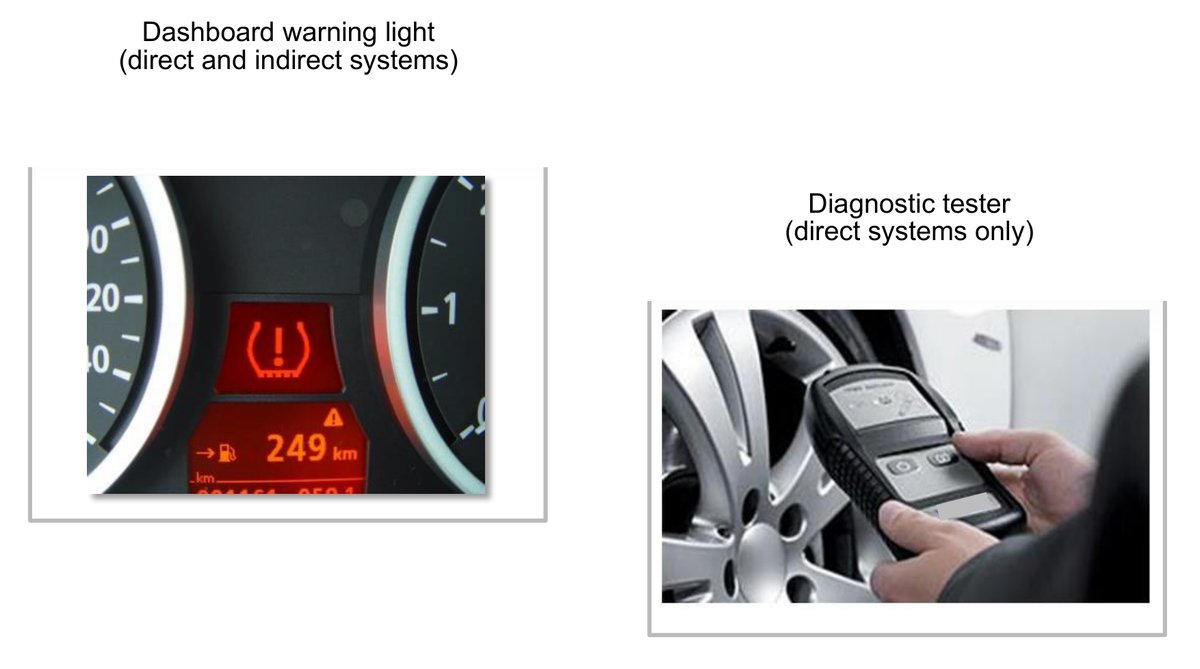
Pressure warning light in the instrument cluster and a TPMS sensor tester.
Valves and service kits
Fit a new valve every time you fit a tyre. If the wheel has a valve-mounted sensor, use a new sensor repair kit (seals, nut, valve core).
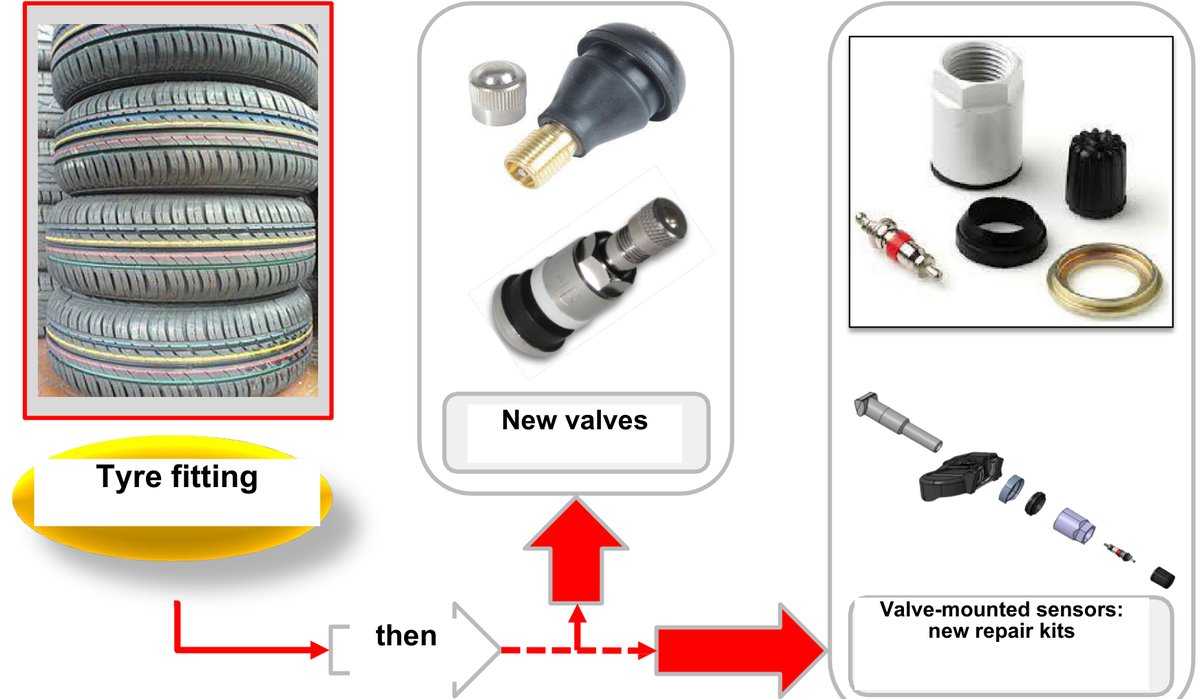
Tyre fitting, then new valves – and for valve-mounted sensors, new repair kits.
Risks when servicing tyres on cars with TPMS
- failing to recognise the TPMS and the requirements that come with it,
- damaging the sensor during fitting or removal:
- when breaking the bead (with the bead breaker blade or rollers),
- through wrong positioning of the take-up point, the sensor or the tools,
- overlooking damage and wear (corrosion),
- skipping the valve service kits,
- unsuitable spare parts or tools,
- a skipped or incomplete function check.
Fitting basics: how a tyre passes over the rim flange
- The inner diameter of the tyre bead is smaller than the outer diameter of the rim at the flange.
- The tyre is joined to the rim by:
- deforming the bead into an ellipse,
- tilting the tyre: half of the bead lies in the rim well while the other half passes over the shorter bead seat of the rim,
- deflecting the tread.
- A high force acts on the bead at the take-up point.
- The fitter's effort and a tyre changer certified for UHP and Runflat tyres are needed.
- Lubrication helps the contacting surfaces slide: tyre, rim, tools and accessories.
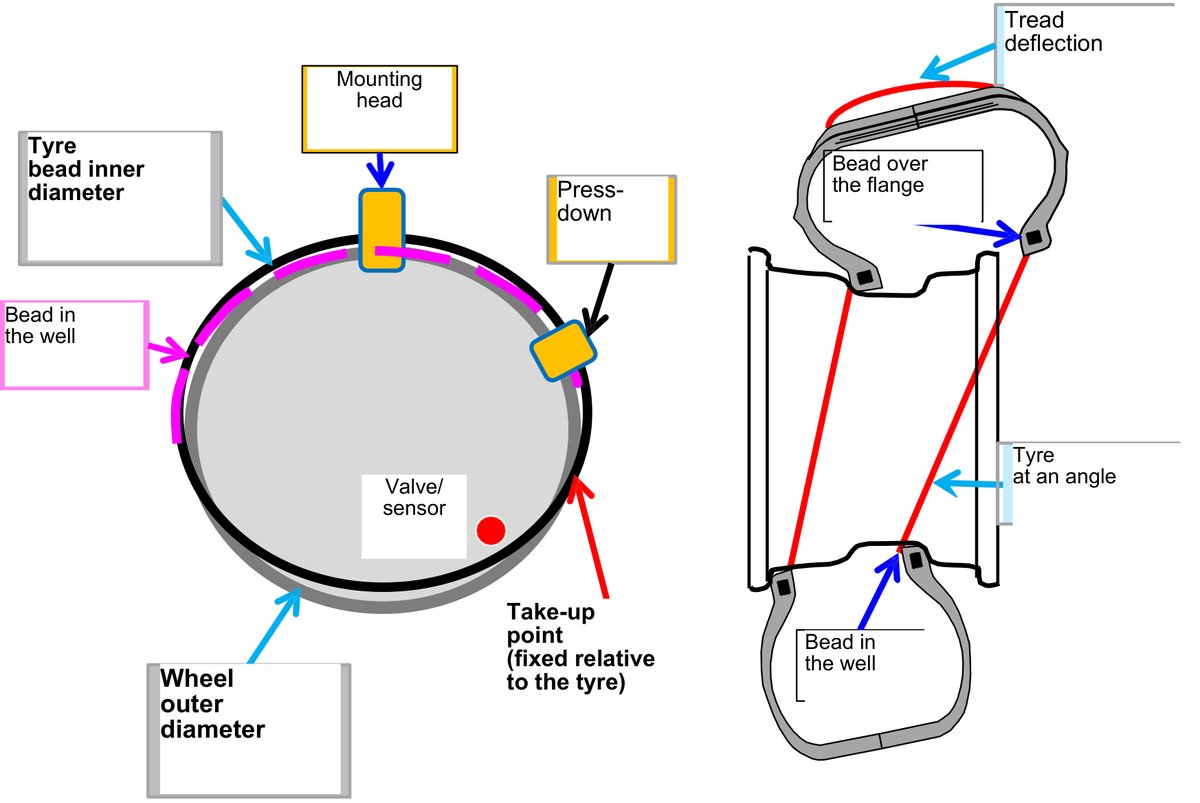
Machine and wheel: mounting head, bead press-down tool, take-up point (fixed relative to the tyre), valve/sensor and the bead in the rim well.
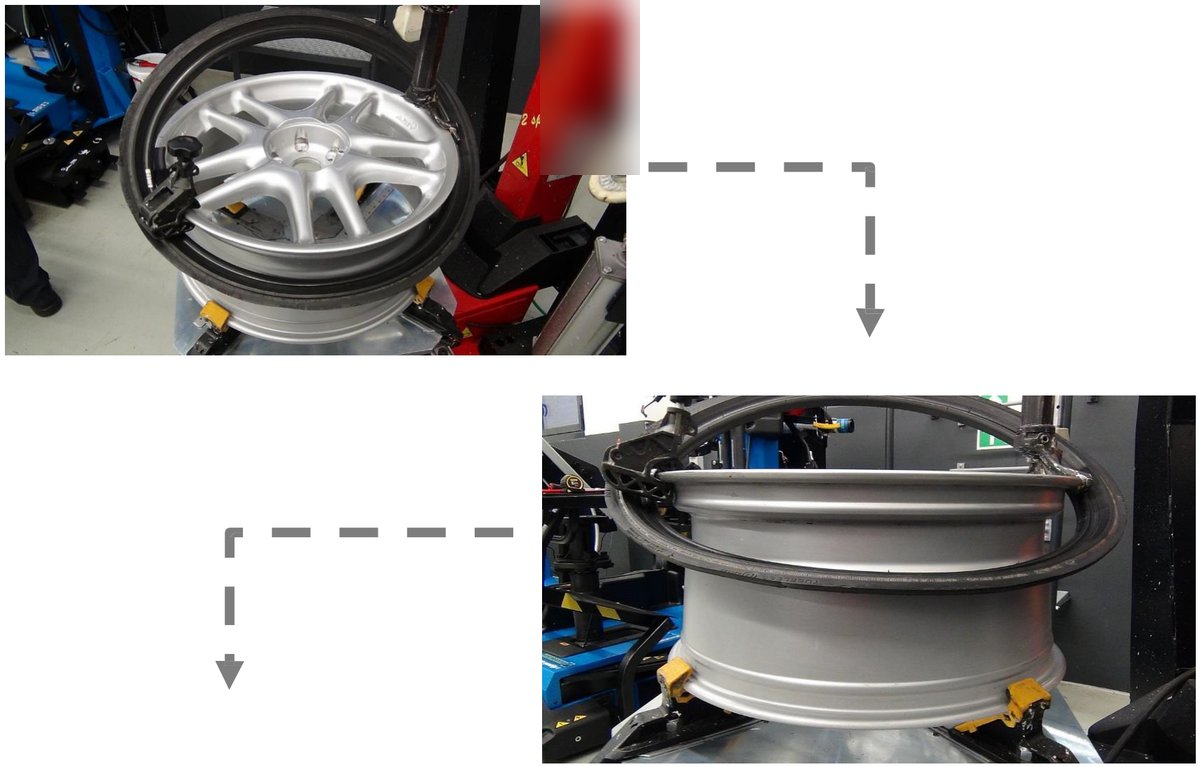
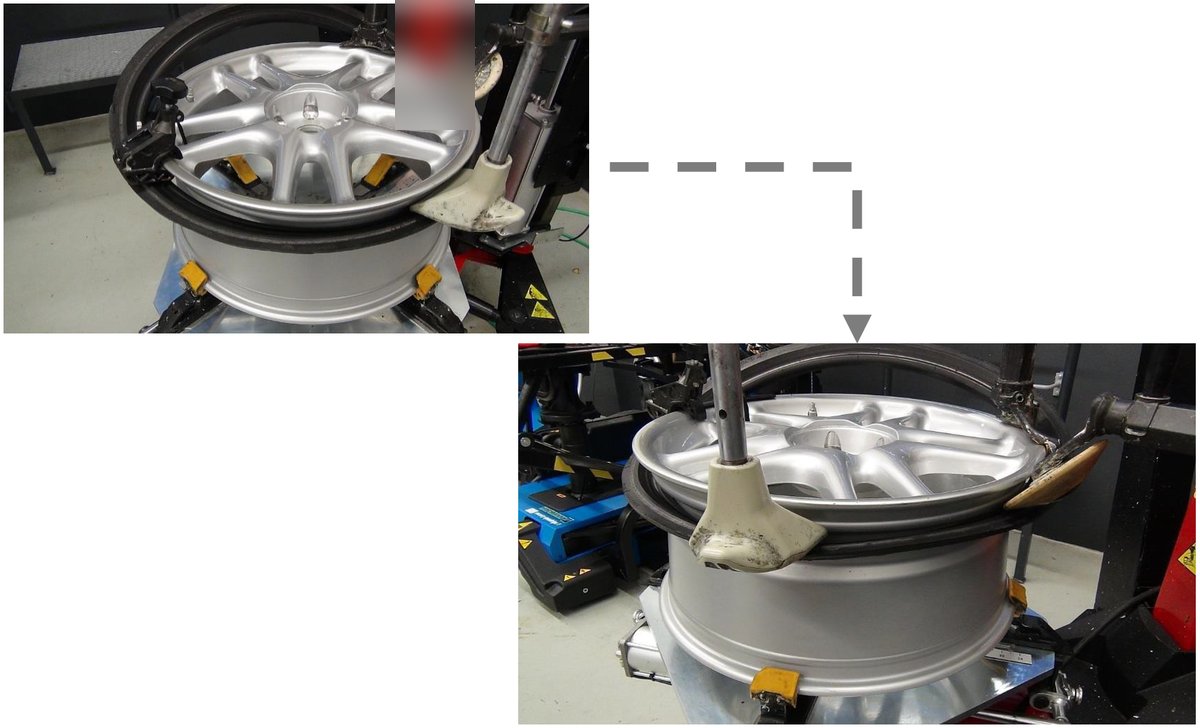
How the tyre and rim move relative to each other during fitting.
Removal and the most common fitting errors
Removal: protect the sensor in the rim well
The bead lying in the rim well, the mounting head and the tyre lever contact point form a triangle. The edges along the circumference are the danger zones. The valve or sensor must not be in them while the bead is being pulled over the flange.
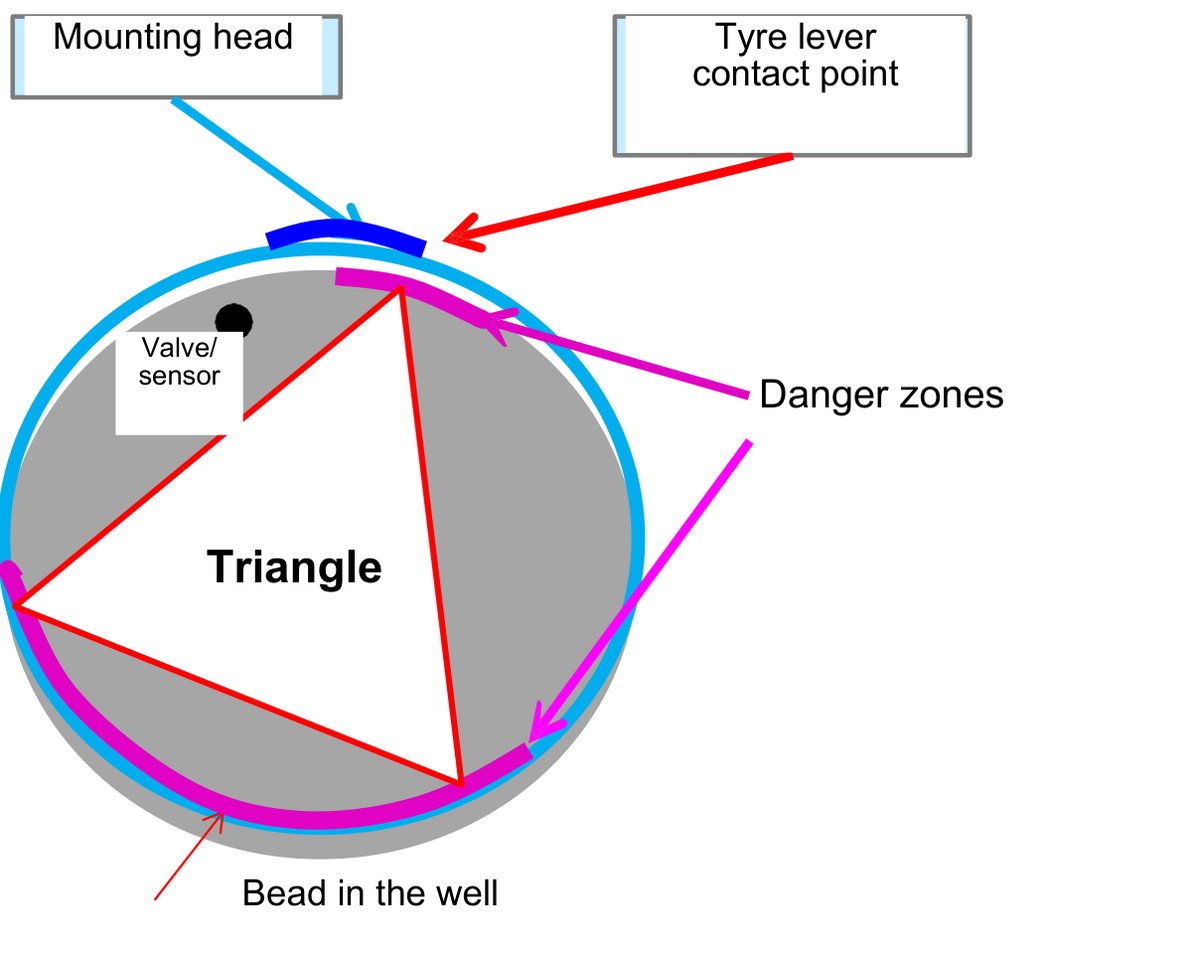
Danger zones for the sensor during removal.
Risks during fitting and removal
- ignoring the fitting instructions and the specific recommendations for the tyre,
- the wrong fitting method:
- solving problems with extra force,
- time pressure,
- no accessories or fitting aids (to save time, or because they are not available),
- insufficient lubrication,
- ignoring the minimum tyre core temperature (15 °C),
- overlooking sources of danger, e.g. worrying noises or incorrect use of the tyre lever.
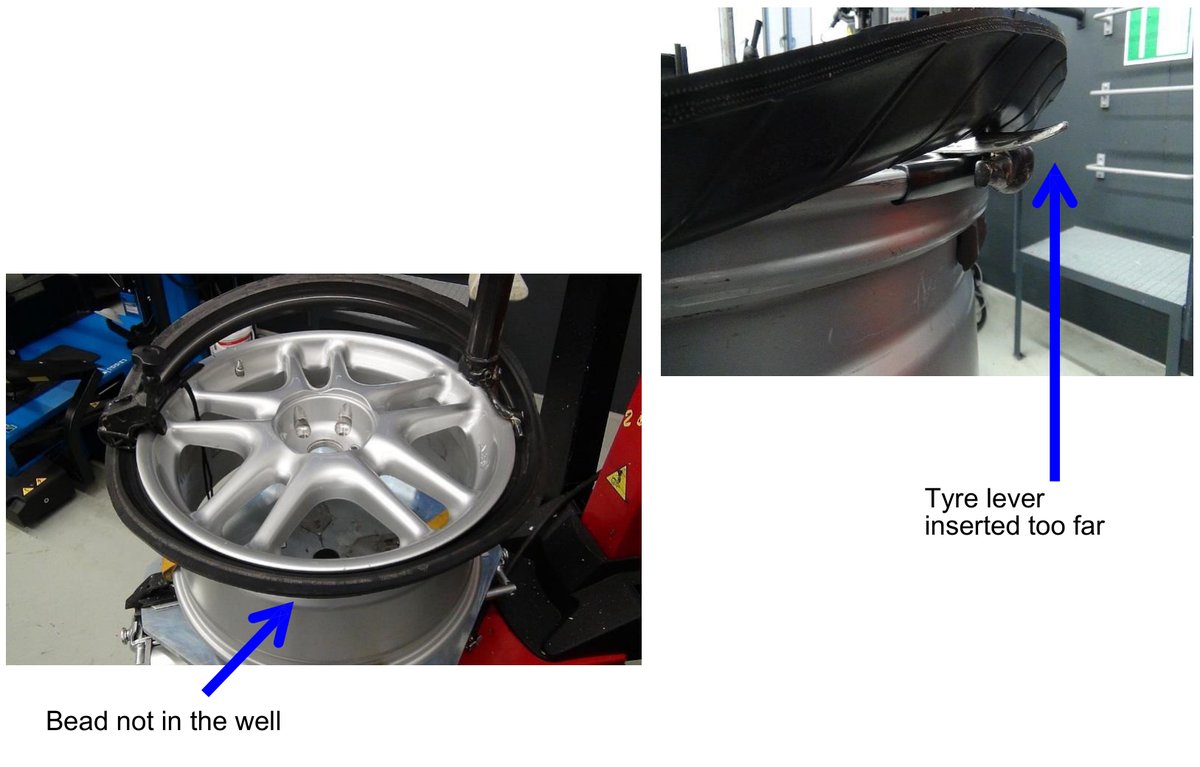
Two typical errors: the bead is not in the rim well, and the tyre lever is inserted too far.
Forces, lubrication and tyre changer settings
Forces
- The construction of UHP and Runflat tyres causes high forces on the bead, sidewall and tread.
- Limit the fitting force.
- Give the tyre time to relax.
Lubrication
- The tyre, rim and tyre changer components move relative to each other, which creates shear forces.
- Sufficient lubrication is required.
- Remember that the drying time of the paste depends on the temperature.
- Use a suitable fitting paste.
- Lubricate every point where something slides.
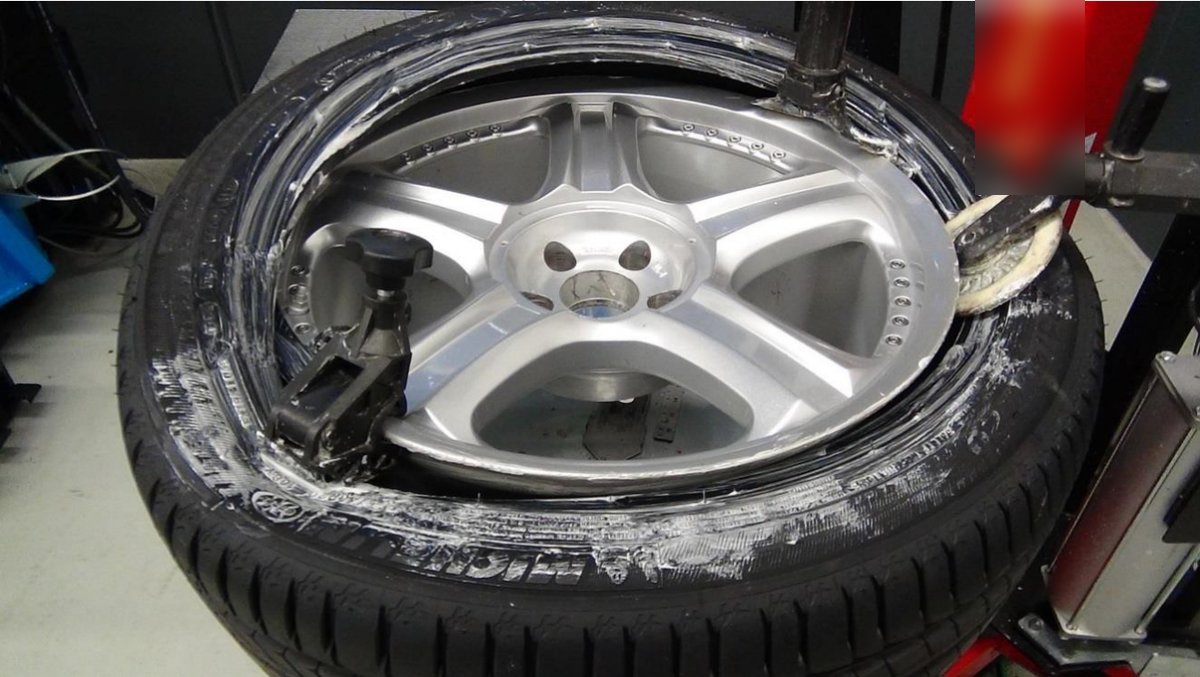
Fitting paste on the sidewall and bead of the tyre.
Machine settings and operation
- Set the machine for the wheel diameter, rim width and rim type.
- Operate the joysticks that move the press-down tool and rollers gently.
- Position the valve or sensor correctly.
- Limit the stroke of the bead breaker blade.
How to fit a Runflat tyre step by step
Positions are given as on a clock face: the mounting head is at 12 o'clock. Always turn the rim in the machine's working direction.
Lower bead
- Apply enough fitting paste:
- inside and outside, on both sides of the bead and sidewall area,
- on the rim hump, on both sides,
- not on the sensor or valve.
- Position the sensor or valve opposite the mounting head, at roughly 6 o'clock.
- Turn the rim slowly.
- Make sure the distance between the sensor and the take-up point is approx. 15 cm.
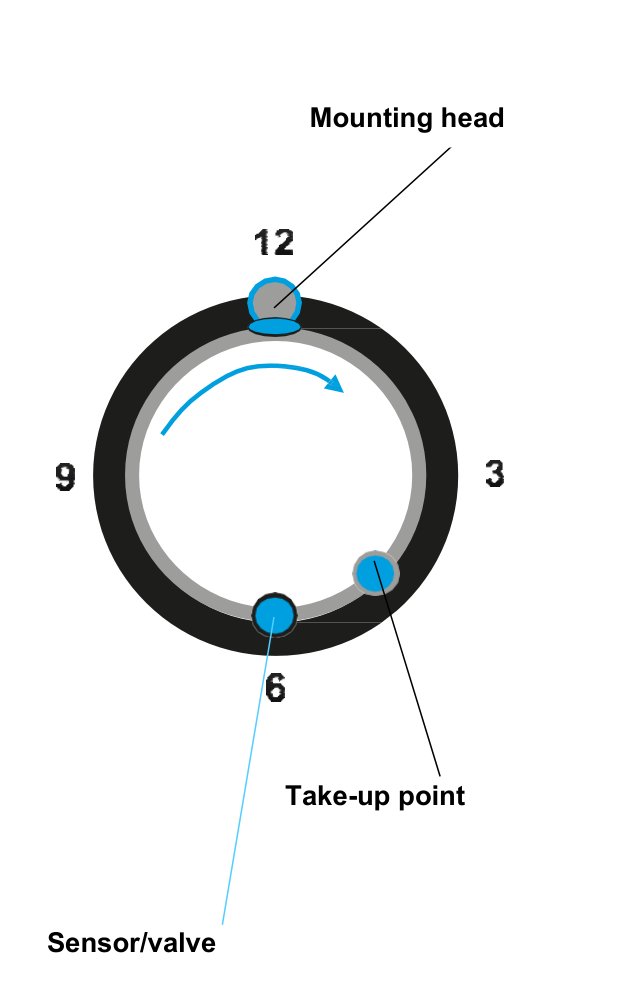
Fitting the lower bead: sensor at 6 o'clock, approx. 15 cm from the take-up point.
Upper bead
- Position the sensor or valve at roughly 5 o'clock relative to the mounting head.
- Place the bead press-down tool at about 3 o'clock and push the bead into the rim well.
- Behind the take-up point, hold the bead in the well with the press-down tool or a hold-down chain.
- Turn the wheel slowly.
- Keep the bead in the rim well with the press-down tool.
- The last section of the bead should snap over the flange slowly, near the sensor.
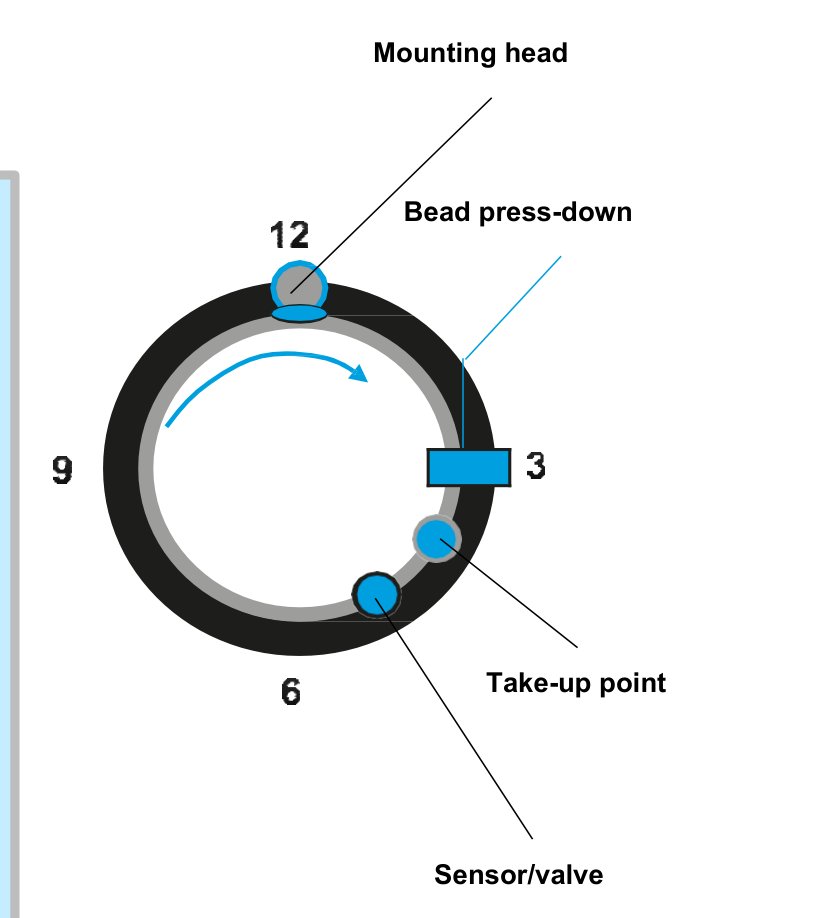
Fitting the upper bead: press-down tool at 3 o'clock, sensor at 5 o'clock.
How to remove a Runflat tyre step by step
Upper bead
- Unscrew the valve core and let all the air out.
- Break the bead off the rim flange with the bead breaker roller. If you use the bead breaker blade, apply it 3–4 times around the circumference, no more than 1 cm from the flange:
- start at 3 or 9 o'clock,
- never apply the blade at 12 or 6 o'clock!
- Position the sensor or valve at the mounting head or just before it (11–12 o'clock).
- Use the press-down tool several times to keep the tyre in the rim well (4–8 o'clock).
- Lift the bead over the flange with a certified tyre lever and hold it.
- Turn the rim slowly.
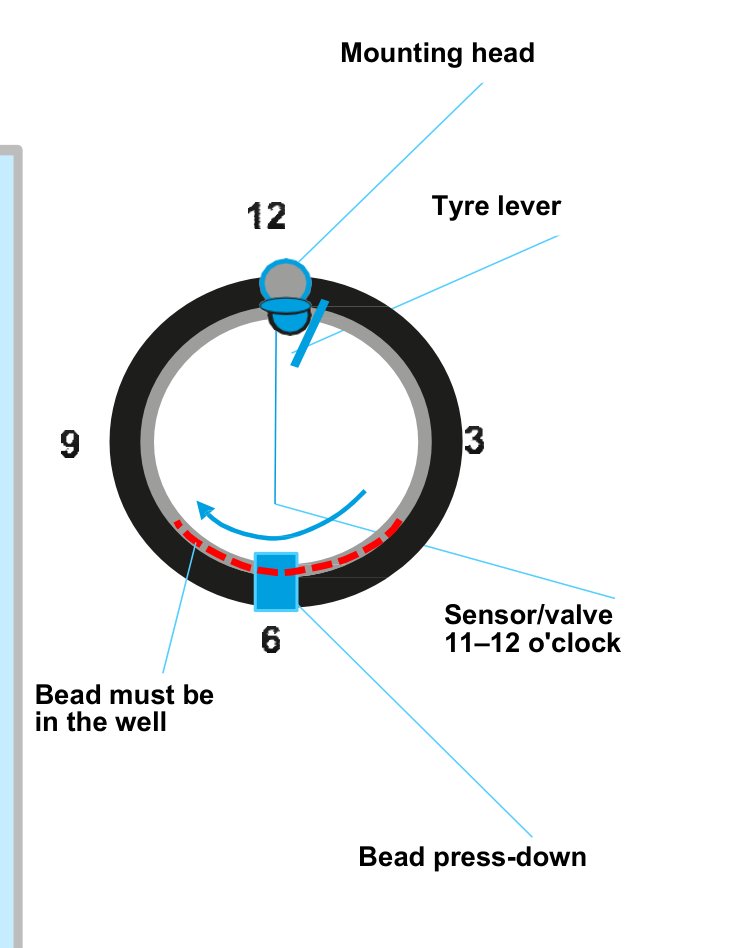
Removing the upper bead: sensor at 11–12 o'clock, the bead must lie in the rim well.
Lower bead
- Position the sensor or valve behind the mounting head, looking in the direction of rotation – as shown in the drawing.
- Lift the bead over the flange with the tyre lever or a suitable aid (roller, plastic lever).
- Turn the wheel slowly.
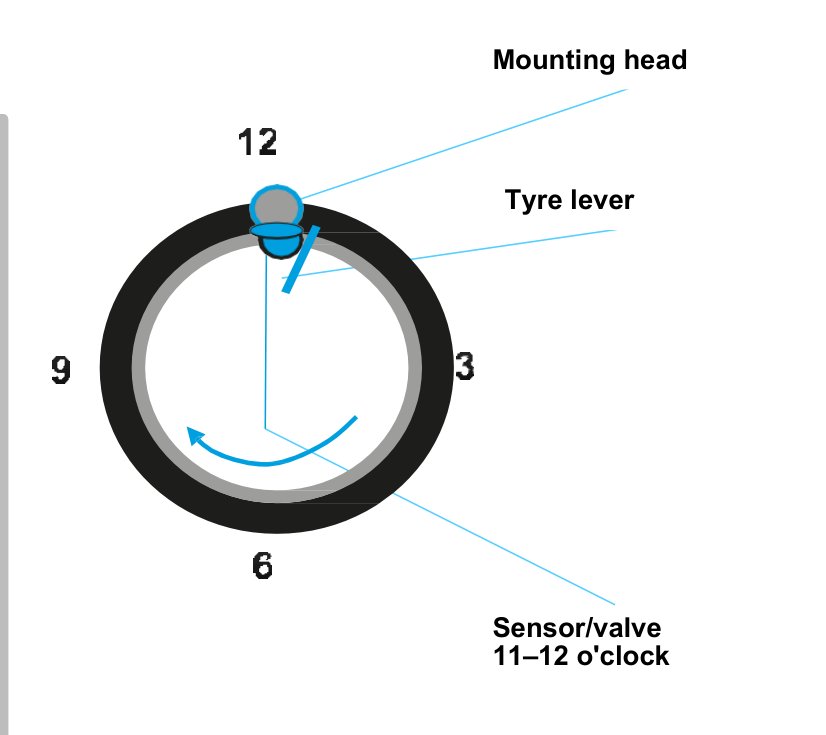
Removing the lower bead: sensor behind the mounting head in the direction of rotation.
Tyre temperature during fitting – minimum 15 °C in the core
Requirement: the sidewalls and beads (ideally the whole tyre) must be at least 15 °C inside the structure – this is the minimum core temperature.
Why above 15 °C:
- the tyre deforms more easily,
- the rubber compound, including the bead core area, stays flexible,
- the bead slides better on the rim.
Why 23–28 °C is optimum:
- the fitting paste slides well,
- the paste dries at the right rate.
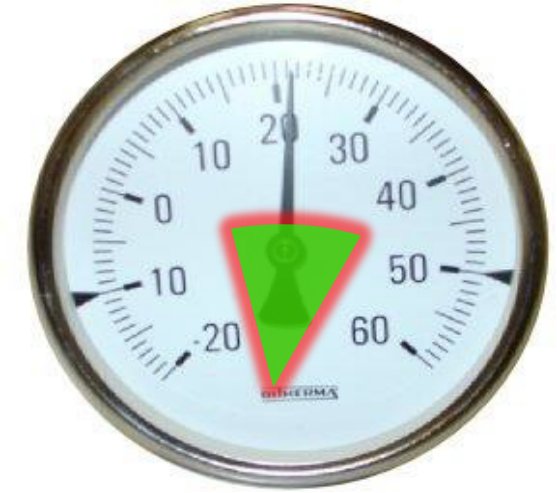
Green field: temperature range for fitting.
Fitting temperatures at a glance
| 30 °C | Preferably do not exceed. At higher temperatures the fitting paste dries very quickly and stops lubricating. The risk of damaging the tyre increases. |
| 23 °C | Optimum (range 23–28 °C). |
| 15 °C | Do not go below! The lower the temperature, the stiffer the bead area and the harder the tyre is to fit. |
How long it takes to warm up a cold tyre
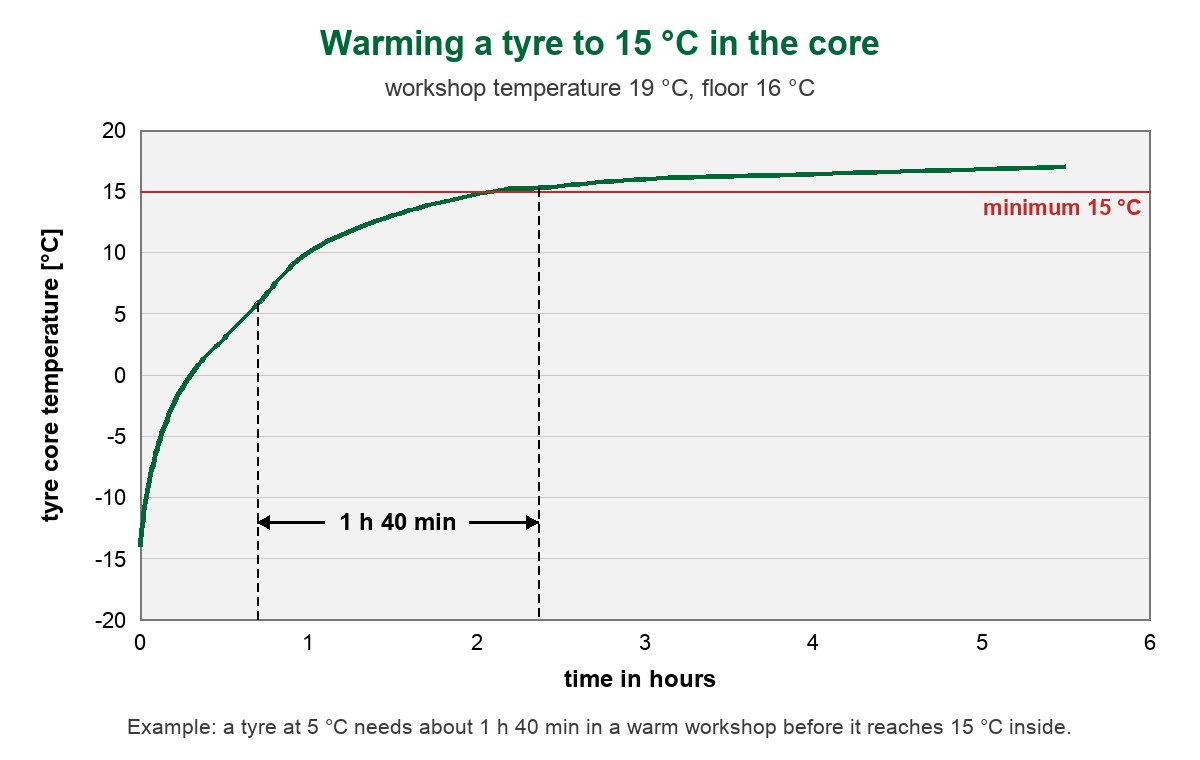
A tyre at 5 °C must stay about 1 h 40 min in a workshop at 19 °C (floor 16 °C) before it reaches 15 °C inside.
The temperature problem in tyre service
- temperature conditions in the workshop, store and container, and the temperature of tyres fitted on the car,
- seasonal tyre changes are concentrated in short periods, and these fall in the cold seasons,
- customer acceptance and satisfaction: appointment slots and waiting time while the tyres warm up.
Solutions for the workshop
- changing tyres when the outside temperature is above 15 °C,
- storing complete wheels, with the tyres changed in advance,
- storing tyres in a heated room (before fitting),
- warming the car up indoors (before removal),
- direct tyre warming: heating cabinet, wheel washer, heating covers.
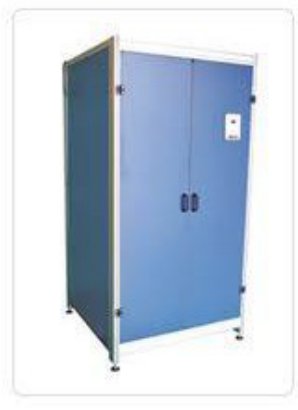
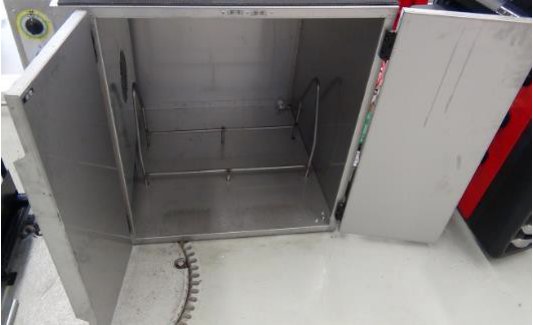
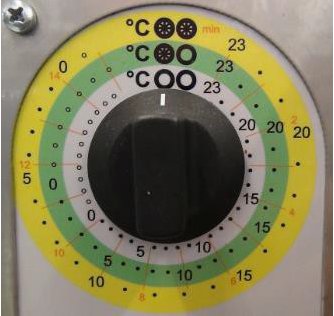
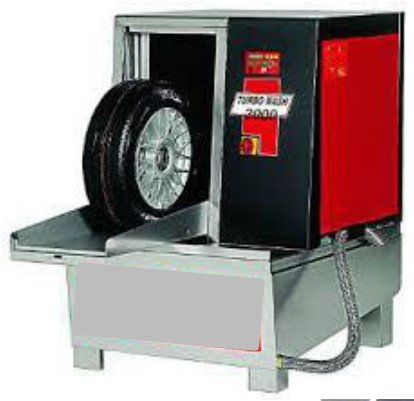
Heating cabinet (outside, inside, thermostat), wheel washer and heating cover.
How to warm a tyre properly
- Leave cold tyres in a heated room long enough before fitting. The surface temperature of a tyre during warm-up tells you nothing about the temperature inside!
- Do not put cold tyres directly on a cold floor – use insulation underneath, e.g. a pallet.
- Stand the tyres individually.
- Do not heat tyres with a fan heater or radiant heater!
Summary: the tyre core temperature must not drop below 15 °C (optimum 23–28 °C). Clean the wheel and tyre and check them for anomalies and damage. Unscrew the valve core and let all the air out. Use a new valve or a sensor service kit.
Health and safety and workplace conditions
Personal protective equipment:

- hearing protection,
- safety footwear,
- gloves,
- safety goggles,
- knowledge of the operating manual and the machine's safety devices.
Lighting: the workstation must be well lit. Use a hand lamp to inspect the tyre.
Noises: sounds during fitting (cracking, crunching) can indicate damage to the tyre. You will only hear them, interpret them and react (e.g. inspect the tyre) if the background noise is low.
Checking the wheel and tyre before fitting
- Compatibility of components (also with the car). Check it using the markings: size, load index, speed rating, permitted rim designation (ETRTO) for the tyre and the rim.
- Wheel and rim. Inside: bead seats, well, valve hole, hump. Outside: flange, balancing weights. Wheel disc and holes.
- Tyre. Side with the production date marking: shoulder, sidewall and bead area. Opposite side: shoulder, sidewall and bead area. Tread: pattern, wear. Inside: inner liner (damage, signs of running flat).
- Valve. Signs of ageing, overstretching; on metal valves – seals and connections.
- TPMS sensor. Seal, connections, openings.
- Contact and sealing surfaces. Cleanliness, corrosion, coating.
Anomaly, damage, inspection – definitions
- Anomaly: a visible mark, irregularity or change in the properties of the components of a complete wheel caused by an external factor.
- Damage (to the wheel, tyre or other components): a permanent, adverse change or anomaly of the surface, geometry or structure (viscoelasticity, internal construction) that impairs the performance or leads to failure. A distinction is made between safety-relevant and non-safety-relevant damage.
- Inspection: establishing whether the components meet the requirements for unrestricted, safe (re-)use, i.e. have no safety-relevant damage.
What to look for on a tyre – examples
- wear and abrasion (on the shoulder, one-sided, in the centre), rubber loss, flat spots, chafing, washouts, cuts, scratches, impressions,
- burrs, protruding fragments,
- cracks, fractures, punctures,
- deformations, kinks,
- discolouration, oxidation, corrosion under the coating,
- swelling, constrictions,
- tears, delamination, separations, bulges,
- changes in the rubber structure (due to heat): thermal decomposition, wrinkling,
- signs of repair.
Note: also look for damage caused by previous removals and fittings!
Fitting damage – why it is so dangerous
- UHP and Runflat tyres often work under high loads.
- Damage cannot be checked or seen once the tyre has been fitted.
- Such damage often carries a delayed risk.
- Even the smallest damage can be safety-relevant.
Requirements for the fitter:
- qualifications for fitting UHP and Runflat tyres (certificate),
- full attention during fitting,
- no time pressure,
- a critical assessment of one's own work,
- correct operation of a certified tyre changer, plus certified accessories and suitable fitting aids.
From the workshop floor
A sensor can be damaged while the bead is being broken, before the mounting head even touches the tyre. The stiff Runflat sidewall tempts you to press the blade harder and deeper. So stick to the rule: start at 3 or 9 o'clock, apply it 3–4 times around the circumference, no more than 1 cm from the flange, never at 12 or 6. Another thing that is easy to forget in the busy season: a tyre brought in from a cold store quickly feels warm to the touch, but the surface temperature tells you nothing about the core. To go from 5 °C to 15 °C inside, a tyre needs about 1 h 40 min in a workshop at 19 °C. Count the time instead of touching the rubber.
Paste brushes, mounting head protectors and rim protectors that keep the rim safe when fitting UHP tyres can be found in our tyre changer parts and accessories section.
Frequently asked questions (FAQ)
What tyre temperature is needed to fit Runflat and UHP tyres?
The tyre core must be at least 15 °C, and the optimum range is 23–28 °C. Above 30 °C the fitting paste dries too quickly and the risk of damaging the tyre increases. A tyre at 5 °C needs about 1 h 40 min in a workshop at 19 °C to reach 15 °C inside.
Where should the TPMS sensor be positioned when fitting and removing a tyre?
When fitting the lower bead, place the sensor opposite the mounting head, at about 6 o'clock, approx. 15 cm from the take-up point. For the upper bead – at about 5 o'clock. When removing the upper bead, place the sensor at the head or just before it (11–12 o'clock), and for the lower bead behind the head in the direction of rotation.
What is the difference between an EH2 and an H2 rim?
An EH2 rim has a higher and longer hump and a greater distance from the flange and from the well than a standard H2 rim. It holds the bead better at too low a pressure, which is why it suits Runflat tyres. EH2+ is a newer version with a rounded hump.
How do you recognise a Runflat tyre?
By the letters RF in the size marking and the symbol on the sidewall (marking according to ISO 16992), and by manufacturer markings such as RSC, MOE, RFT, ZP, SSR, DSST, EMT, HRS or XRP.